After the basics….
Once you’ve established the 6 Basic Finger Patterns for teaching strings, and how to name notes using the Note Circle, teaching students to play in different keys becomes easy. You don’t even have to teach them how to play a scale!
Sometimes, we just don’t have time for scales….
I get it. Some of us are teaching strings with very little class time at our disposal. There are so many things we have to cover when teaching a classroom of strings, sometimes scales are just not a priority, particularly in the beginning stages.
However, many beginner pieces are written in G Major, and getting students to play C natural on the A string is often a challenge at first. I find I usually need this note right around winter concert season. At this time of year, my students know just enough to play something half-decent, but not enough to introduce a 2-octave scale just yet. There is barely enough time to get their performance pieces ready – and definitely not enough time to introduce new skills, such as shifting, for the class to be able to play a two-octave scale together.
After learning the 6 Basic Finger Patterns however, I CAN easily introduce the finger patterns for the key of G Major.
Easily introduce a new key.
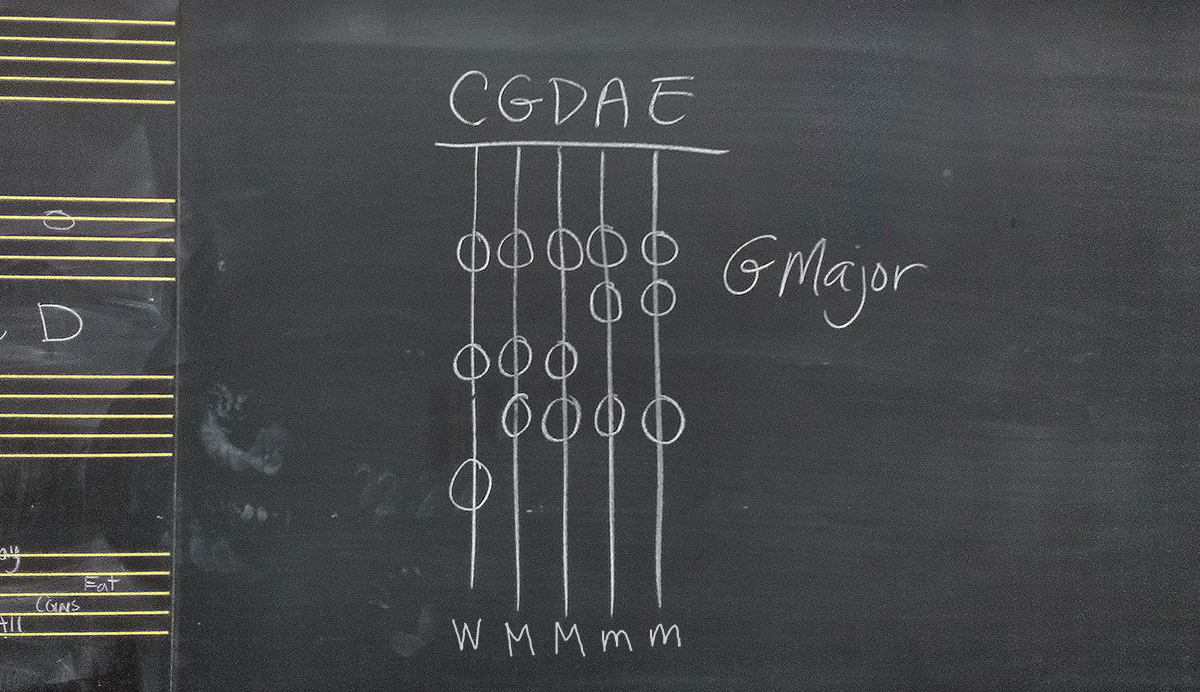
To introduce G Major to all the instruments in just one step, all I do is draw all five strings on the board. The students then identify the patterns on each string. (The strings, of course, will be backwards for the bass.) As they identify and name each pattern, I write the abbreviation underneath each string to help students recognize and remember them. G Major would then be as follows:
C-string – Whole Tone Pattern (W)
G-string – Major Pattern (M)
D-string – Major Pattern (M)
A-string – Minor Pattern (m)
E-string – Minor Pattern (m)
Pretty easy.
Visualization is key to learning a new key!
Well, you might be thinking, I can teach students how to play in a new key without using patterns or a fingering chart. However, you will find that drawing the pattern on the board, and having them identify and name the patterns they need, gives structure to an otherwise mysteriously empty fingerboard. It helps students visualize and learn the correct fingering much more quickly and addresses different learning styles. It also sets students up to expect to use different finger patterns for different keys in the future.
Demonstrate the difference.
Listening is also an important part of introducing a new finger pattern and a new key. For example, the first time I introduce the Minor Pattern in a piece, I often demonstrate a passage of music using the wrong pattern. In other words, in G Major I would use the Major Pattern on all the strings so they can hear that it sounds wrong. Then I contrast it by playing the passage with the right patterns and let them hear the difference. This helps to demonstrate to them that they can actually hear when something sounds wrong, and that using the correct finger pattern is important and makes a big difference.
Let them hear it for themselves.
Next, I let them try the same passage for themselves, first with the wrong fingering and then with the correct fingering. They get to experience for themselves the difference between notes that sound right and notes that sound wrong due to the wrong finger pattern. This trains their ear to be aware of the need to put their fingers in the right place, and the need to watch out for wrong-sounding notes. This is something that is important to establish early so that students trust in their own ability to hear wrong notes and fix them, and so that they are motivated to play the right ones.
Fingering charts make introducing keys easy.
Finger patterns and fingering charts are a great way to introduce keys without having to teach an entire scale if you don’t have time for it. It is also quick and easy to draw all five strings on the chalkboard for students to see instead of trying to explain or demonstrate to every instrument which fingers they need to use on every string.
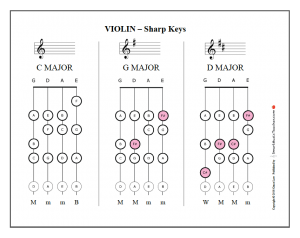
Better yet, if you want something that the students can take home to learn, and includes the names of the notes, print this great set of First Position Fingering Charts for Beginner Strings that I was inspired by this post to make!
Teaching beginners to play in different keys is easy. What are you waiting for? Get started Teaching by Finger Pattern now.


Leave a Reply